Shower mold has a habit of coming back. You scrub it off, it looks clean for a week, and then it’s back in the same spots. Most people treat the visible symptom without addressing what’s actually causing it, which is why the problem keeps repeating.
Removing shower mold properly requires understanding what type of mold you’re dealing with, using the right product for the surface it’s on, allowing enough dwell time for the cleaning agent to work, and then changing the conditions that allowed mold to establish itself in the first place.
This guide covers all of it, including the specific techniques that work on different surfaces in the shower, why mold keeps coming back in certain areas, how to tell when the problem is beyond surface cleaning, and what to do about persistent mold in a Minnesota home where humidity management has its own seasonal challenges.
What Is Shower Mold and Why Does It Grow There?
Mold is a fungus that grows wherever three conditions are present simultaneously: moisture, organic material to feed on, and relatively still air. Showers provide all three. Water is present constantly. Soap residue, skin cells, and body oils provide organic material. Steam creates warm, moist air that doesn’t circulate well in enclosed shower spaces.
The most common types of shower mold are Cladosporium, Penicillium, and Aspergillus. These appear as black, gray, or greenish discoloration on grout, caulk, tile, and shower surfaces. They’re the molds that respond to proper cleaning. Stachybotrys chartarum, commonly called black mold, grows under different conditions (sustained heavy moisture from leaks or flooding) and is less common in shower surfaces.
Understanding this distinction matters: the dark mold on your shower grout is almost certainly a common surface mold, not the hazardous variety that makes the news. But it’s still worth eliminating promptly, because it affects air quality and indicates moisture management issues that can lead to bigger structural problems over time.
Identifying Where Shower Mold Is Growing
Before choosing a cleaning approach, identify exactly where the mold is:
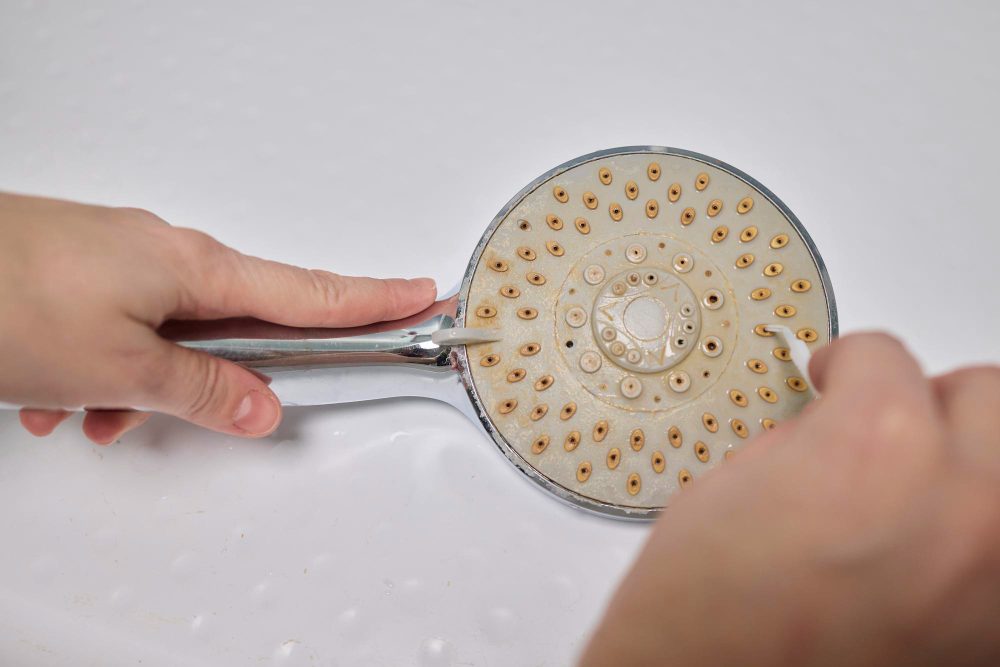
Grout lines: The most common location. Grout is porous and absorbs moisture and soap residue, creating ideal mold conditions below the surface. Surface cleaning alone doesn’t reach the mold roots in porous grout.
Caulk around the tub or shower base: Mold in caulk penetrates the material itself. If the caulk is turning black or gray and cleaning doesn’t clear it, the mold has gone into the caulk, not just onto it.
Tile surface: Non-porous tile is the easiest surface to clean. Surface mold on tile responds quickly to most cleaning agents.
Shower door tracks and frames: These collect standing water and soap residue and are frequently neglected. Dark buildup in the tracks is usually a combination of mold and soap scum.
Shower ceiling: Mold on the ceiling indicates that steam is rising and condensing there without adequate ventilation. This is a ventilation problem, not just a cleaning problem.
Behind tiles or in wall cavities: If mold keeps returning very rapidly (within days) despite cleaning, or if there’s a persistent musty smell even after cleaning, mold may be growing behind the tile where water has penetrated through failed grout or caulk. This requires professional assessment.
What You Need Before You Start
Gather supplies before you begin. Working with mold cleaning products requires respiratory protection.
- N-95 respirator mask (not just a cloth mask)
- Safety glasses
- Rubber gloves
- Stiff-bristled grout brush and an old toothbrush
- Spray bottle
- White distilled vinegar
- Hydrogen peroxide (3%)
- Oxygen bleach (OxiClean or similar)
- Chlorine bleach (for white grout only, not colored grout)
- Baking soda
- Microfiber cloths
- Ventilation: open the bathroom window and run the exhaust fan
Never mix bleach with vinegar, ammonia, or any other cleaner. The combination produces toxic chloramine gas. Use one product at a time, rinsing thoroughly between applications if switching.
How to Remove Mold From Shower Grout
Grout is the most challenging surface because mold penetrates the porous material rather than just sitting on top.
Method 1: Hydrogen Peroxide (Best for Most Shower Grout)
Hydrogen peroxide kills mold at the root level, penetrates porous grout better than bleach, and doesn’t produce harsh fumes. It’s the best starting point for most shower grout mold.
Apply 3% hydrogen peroxide directly to the moldy grout with a spray bottle. Do not dilute it. Let it sit for 15 to 20 minutes. The dwell time is critical. Spraying and immediately wiping distributes mold spores without killing them.
After 15 to 20 minutes, scrub the grout lines with a stiff grout brush, working along the grout line direction. Rinse thoroughly with warm water. For heavy mold, repeat the application.
Method 2: Baking Soda and Hydrogen Peroxide Paste (For Heavy Mold)
Mix hydrogen peroxide and baking soda into a paste. Apply the paste to moldy grout lines and press it into the grout with a brush. Let it sit for 20 to 30 minutes. Scrub with a grout brush and rinse completely.
The baking soda acts as a mild abrasive that helps lift embedded mold from the grout surface while the hydrogen peroxide kills the mold at depth.
Method 3: Oxygen Bleach (For Stubborn Staining)
OxiClean or similar oxygen bleach products are effective on heavily stained white or light grout. Mix to a thick paste with a small amount of water. Apply to grout, cover with plastic wrap to prevent drying, and leave for 30 to 60 minutes. Scrub and rinse.
Oxygen bleach is safe on colored grout, unlike chlorine bleach. It’s the strongest effective option that doesn’t risk discoloring your grout.
Method 4: Chlorine Bleach (For White Grout Only, Heavy Mold)
For white grout with severe, established mold staining, a diluted bleach solution (one part bleach to ten parts water) applied with a brush and left for 10 to 15 minutes is effective. Rinse completely and ventilate the bathroom well.
Never use chlorine bleach on colored, tan, or gray grout. It will permanently discolor or bleach the grout unevenly.
How to Remove Mold From Shower Caulk
This is the most commonly misunderstood situation. If mold has penetrated the caulk itself, cleaning products won’t solve the problem permanently. They clean the surface, the mold regrows from inside the caulk within weeks, and the cycle repeats.
For light surface mold on caulk that hasn’t penetrated deeply: Apply hydrogen peroxide directly and let dwell for 20 minutes. Scrub with an old toothbrush. This works when the mold is recent and hasn’t embedded itself in the caulk material.
For established mold in caulk: Remove the caulk entirely using a caulk removal tool or a utility knife. Remove every trace of the old caulk and allow the joint to dry completely, at least 24 to 48 hours. Apply new mold-resistant caulk (it contains an antifungal agent) and allow it to cure fully before exposing to water.
Recaulking is the permanent solution for moldy caulk. Cleaning is a temporary fix that will need repeating.
How to Remove Mold From Shower Tiles
Tile is non-porous and the easiest shower surface to clean. Mold on tile surface typically responds quickly to standard cleaning agents.
Spray with white vinegar or hydrogen peroxide. Let sit for 10 to 15 minutes. Wipe clean with a microfiber cloth and rinse.
For natural stone tile (marble, travertine, limestone): Never use vinegar or any acid-based product. These permanently etch and damage natural stone. Use a pH-neutral tile cleaner or hydrogen peroxide on natural stone only.
For the shower door glass and tracks: Apply undiluted white vinegar to glass, let sit 15 minutes, scrub with a non-scratch sponge and rinse. For the tracks, use an old toothbrush and the same vinegar solution. Rinse and dry the tracks completely after cleaning.
How to Remove Mold From the Shower Ceiling
Mold on the shower ceiling requires extra care because working overhead with cleaning solutions creates drip and splash hazards.
Apply hydrogen peroxide using a sponge on a long handle rather than a spray bottle. Let dwell for 15 minutes. Scrub with a brush attached to an extension pole and rinse.
Shower ceiling mold is a reliable indicator of inadequate ventilation. Cleaning it repeatedly without addressing ventilation is a losing battle. See the prevention section below.
Why Shower Mold Keeps Coming Back
If mold returns consistently in the same spots within days or weeks of cleaning, one of these causes is usually responsible.
Inadequate ventilation: The exhaust fan isn’t running long enough, isn’t sized adequately for the bathroom, or isn’t venting properly (some fans vent into the attic rather than outside, which spreads moisture and can cause structural damage). The fan should run during and for at least 20 minutes after every shower.
Caulk or grout failure: Water is penetrating behind the tile or shower base through cracked caulk or deteriorating grout. This creates moisture in the wall cavity where mold grows in conditions you can’t see or reach with cleaning products. Signs include mold returning very quickly, soft or soft-feeling wall sections near the shower, or a persistent musty smell even after thorough cleaning.
Inadequate moisture removal after showering: Steam and water remaining on shower surfaces after each use constantly refreshes the moisture supply mold needs. See prevention steps below.
Product sensitivity: Some cleaning products kill surface mold but don’t penetrate grout deeply enough. Switching from a surface cleaner to hydrogen peroxide or oxygen bleach on porous grout often resolves the reoccurrence issue.
How to Prevent Shower Mold From Returning
Cleaning shower mold thoroughly is step one. Preventing its return requires changing the moisture conditions in the bathroom.
Run the exhaust fan properly. During every shower and for 20 minutes afterward. If your bathroom has no exhaust fan or a weak one, this is the single most impactful improvement you can make.
Squeegee shower walls and glass after every use. This takes 30 seconds and removes most of the water before it can evaporate and maintain the moisture that mold needs. A shower squeegee kept inside the shower removes this friction.
Leave the shower door or curtain open after showering. Closing the shower immediately after use traps humidity inside, extending the moist period. Leaving it open allows airflow that dries surfaces faster.
Apply a grout sealer after cleaning. Clean, dry grout treated with a penetrating grout sealer is significantly less porous and absorbs less moisture and soap residue. Sealed grout resists mold much more effectively than unsealed grout. Reapply annually.
Use a daily shower spray. Spraying shower surfaces with a diluted hydrogen peroxide solution or a commercial daily shower spray after each use inhibits mold growth between cleaning sessions. Takes 15 seconds.
Fix caulk and grout failures promptly. Any crack in caulk or deterioration in grout that allows water to penetrate behind the tile is a mold factory in the wall cavity. Recaulk and regrout as needed.
Minnesota-Specific Shower Mold Considerations
Minnesota’s climate creates specific bathroom moisture challenges.
During winter, homes are sealed for months with minimal fresh air exchange. Indoor humidity from cooking, bathing, and breathing has nowhere to escape. Bathrooms that may dry out adequately in more temperate climates during winter stay persistently damp in Minnesota homes.
HVAC systems during heating season dry the air significantly, but that dry air doesn’t reach inside shower enclosures effectively. The result is that shower surfaces stay moist longer between uses during Minnesota winters.
Running the exhaust fan consistently and using a bathroom humidity monitor (available for under $20 at any hardware store) helps. If bathroom humidity consistently exceeds 60 percent between showers, additional ventilation is warranted.
When to Call a Professional Cleaning Service
Surface shower mold that hasn’t returned rapidly is manageable with the steps in this guide. Professional bathroom cleaning makes sense when:
The mold is extensive and covers large grout areas that would require hours of hand scrubbing. A professional team completes this work in a fraction of the time with commercial-grade products.
The bathroom needs a full deep clean, not just mold treatment. Our deep cleaning service covers grout, caulk, tile, and every other bathroom surface in a single professional visit.
Frequently Asked Questions
What kills mold in a shower?
Hydrogen peroxide (3%), oxygen bleach (OxiClean), and chlorine bleach (for white grout only) all effectively kill shower mold. Hydrogen peroxide is the most versatile option: it kills mold, penetrates porous grout, is safe on most colored surfaces, and doesn’t produce harsh fumes. Dwell time of 15 to 20 minutes is essential.
Does vinegar kill shower mold?
White vinegar kills approximately 82 percent of mold species and is effective on light shower mold, particularly on non-porous surfaces. It penetrates grout better than bleach. For established or heavy mold in grout, hydrogen peroxide or oxygen bleach is more effective. Never use vinegar on natural stone tile.
Why does mold keep coming back in my shower?
The most common causes are insufficient ventilation (the exhaust fan isn’t running long enough or isn’t sized properly), mold penetrating the caulk rather than just sitting on the surface (requiring caulk replacement), or grout and caulk failures allowing water to reach wall cavities. Addressing the root cause is necessary to stop recurrence.
Is shower mold dangerous?
Common shower surface molds (Cladosporium, Penicillium, Aspergillus) are typically irritating rather than hazardous for healthy adults. They can worsen respiratory conditions and cause allergic reactions. If you suspect a more serious mold type due to significant water damage or rapid reoccurrence, contact a mold remediation professional for testing and assessment.
How do I know if mold is in my shower walls?
Signs of mold in wall cavities behind shower tile include mold returning within days of cleaning, soft or spongy tile or wall sections, peeling grout or caulk, and a persistent musty smell even after thorough cleaning. This requires professional assessment, not DIY cleaning.
How long does it take to remove shower mold?
A single shower treated with hydrogen peroxide and scrubbed properly takes 45 to 90 minutes. Extensive mold on multiple grout surfaces takes longer. Professional cleaning teams complete the work faster with commercial equipment.
Can I use a steam cleaner to remove shower mold?
Yes. Steam cleaning at high temperatures kills mold effectively on tile and non-porous surfaces and is chemical-free. It’s less effective on deep grout mold compared to hydrogen peroxide with dwell time, but it’s a good option for regular maintenance cleaning and for households preferring to avoid chemicals.
Get Your Shower Properly Clean
Removing shower mold thoroughly and preventing its return is a realistic goal with the right approach. The key is using the right product for the specific surface, giving it enough time to work, and then changing the moisture conditions that allowed mold to establish.
If the scope is beyond a DIY session, SHINENOS’s deep cleaning service handles mold removal throughout the bathroom in a single professional visit. Contact SHINENOS to book your bathroom deep clean.